How to Apply for WES Evaluation in 2024: A Step-by-Step Guide for Nepali Students
In this article, I have explained the procedure for applying for the WES evaluation for Nepalese students who want to pursue their education or career further in the USA, Canada, or New Zealand. If you are not well introduced to what the WES evaluation is or how important this evaluation really is for your further studies abroad, then I would advise you to go through my previously written article on “Important details about WES evaluation for Nepali students.” There, I elaborate on the importance of WES and how it could help change your pursuit of studying abroad or working. Reading that article first will make it easier to understand and navigate through this process. If you have already read the article and are ready to take the next steps, let’s begin with the detailed procedure to apply for a WES evaluation.
Step 1: Choosing the country of application
To begin this process, you must first go to the WES website. After that, the very first step in your WES evaluation journey is to select the country where you plan to use your evaluation report. Since this guide is for those applying to the United States, you’ll select “USA” from the available options. This choice is crucial because the evaluation standards and requirements may vary depending on the country.

Step 2: Entering your email address
Once you have selected the United States as your country of application, the next step in the WES evaluation process involves entering your email address. This is an important step because your email address will be used by WES for all future communications regarding your application. So enter the correct name and your personal email address.

Step 3: Verify your email address and enter the verification code
Now, WES will send a verification code to ensure that this is your email address. Check your email inbox (and the spam/junk folder, just in case) for the verification email from WES, then enter the provided code in the designated area on the application form to verify your email address.

Step 4: Enter your account details
For this step, you’ll need to provide your personal information, including your full name and date of birth, and create a password. Additionally, you’ll be asked to select a security question. There’s also a question asking if you have a WES Reference Number; by default, this is set to “no.” Unless you’ve previously started an application with WES, do not change this setting. Ensure all details are entered correctly, then click “Next” to proceed.


Step 5: Enter additional personal details
At this step, you will further need to fill up your personal details, such as your first name, date of birth (DOB), gender, and telephone number. This includes information meant to confirm your identity and is necessary in case there is any further contact from WES in the future. Further on, you will see a field where it asks how you knew about WES. Put in this field “WES website,” and that means where you heard about WES.

Step 6: Select the primary purpose for the evaluation
At this stage, you’ll be asked your major purpose for seeking evaluation from WES. The possible selections include employment, immigration, and education; usually, students need it for education, so you may select “education” from the options.

Step 7: Choose your level of education
In this step, WES asks you to select the level of education. The options include “undergraduate freshmen,” “undergraduate transfers,” and “graduate admission,” among others. If you’re applying for the first time as an undergraduate, you would select “Undergraduate Freshman.” However, for the purposes of this article, we’ll choose “graduate” as the level of education. Remember, the process remains consistent regardless of the level of education selected; the key is to choose the option that best matches your academic intentions.

Step 8: Add credential details
Next, click the “Add Credential” button to input the details of your previous education. You’ll need to specify the country where you received your education, the type of education (e.g., high school or undergraduate level), provide your first and last name as they appear on your educational documents, and enter the year your degree was awarded. Also, include the years you attended, starting from the year you began your studies to the year you completed them.


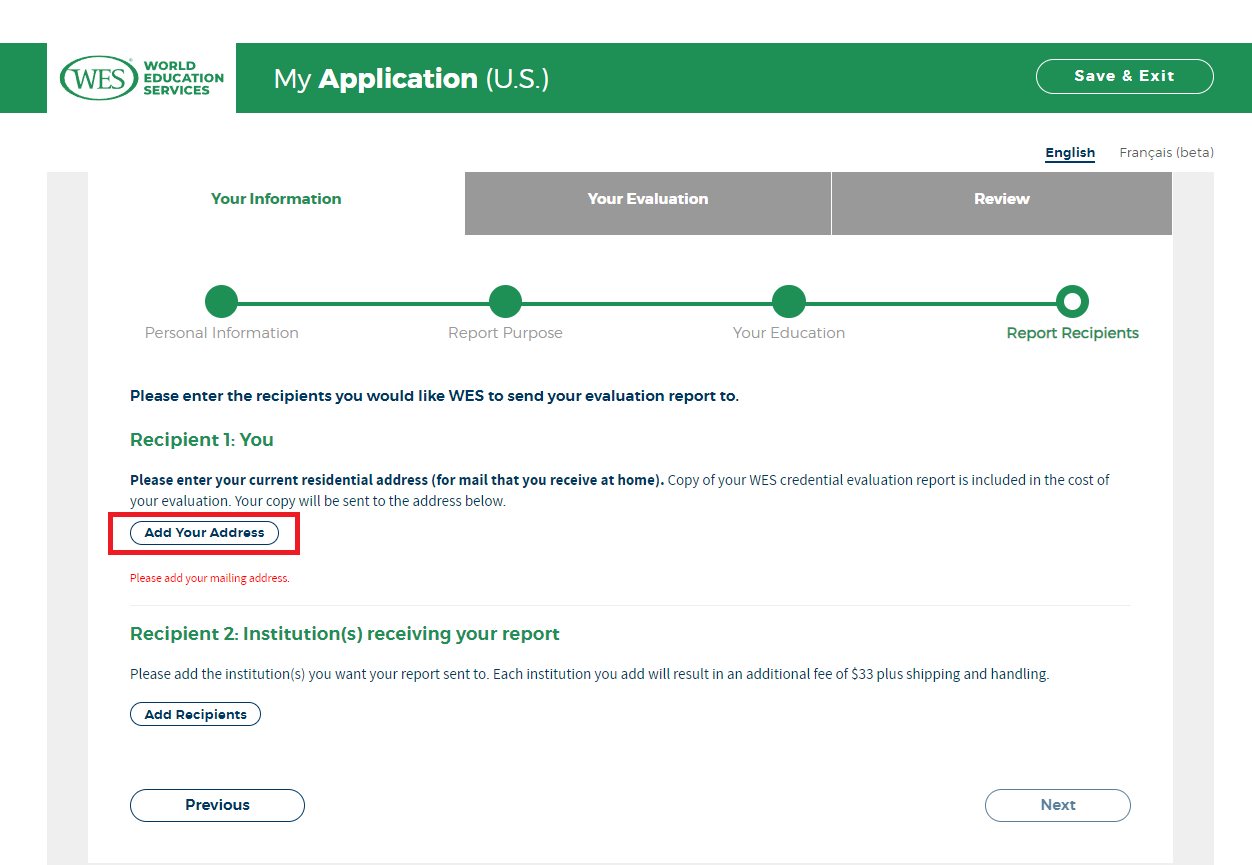
Step 9: Add your mailing address and select the delivery method
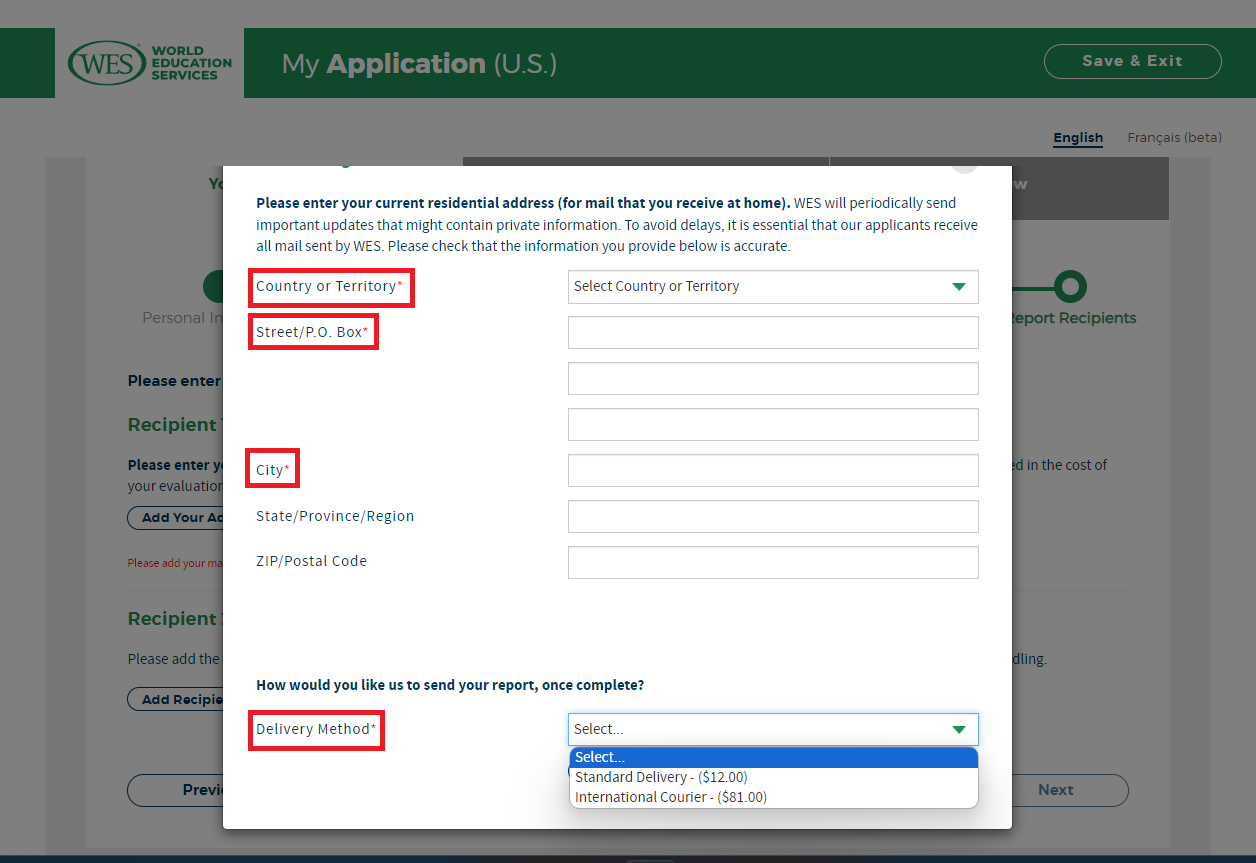
After providing your educational credentials, the next step is to enter your mailing address details, including your country of residence, street name, city, and state or postal code. It will be important for WES to be able to forward any correspondence, if at all required. Additionally, you’ll choose how you want your evaluation report sent to the institution. You have two choices:
Standard Delivery: A cost-effective option that takes longer to reach the institution. Ideal if you are not in a hurry and looking to minimize expenses.
International Courier: A faster, more secure delivery method for those who need their report urgently. It’s more expensive but suitable for tight deadlines.
Select the delivery method that aligns with your needs, considering both your budget and timeline. Ensure your mailing address is accurate to avoid delays in receiving materials from WES.
Step 10: Select the evaluation type and WES service
Choose the type of evaluation based on your needs.
Course-by-Course Evaluation: Ideal for those planning to pursue graduate-level programs, providing detailed course-level analysis.
Document-by-Document Evaluation: Suitable for undergraduate admissions, offering a general overview of your qualifications.
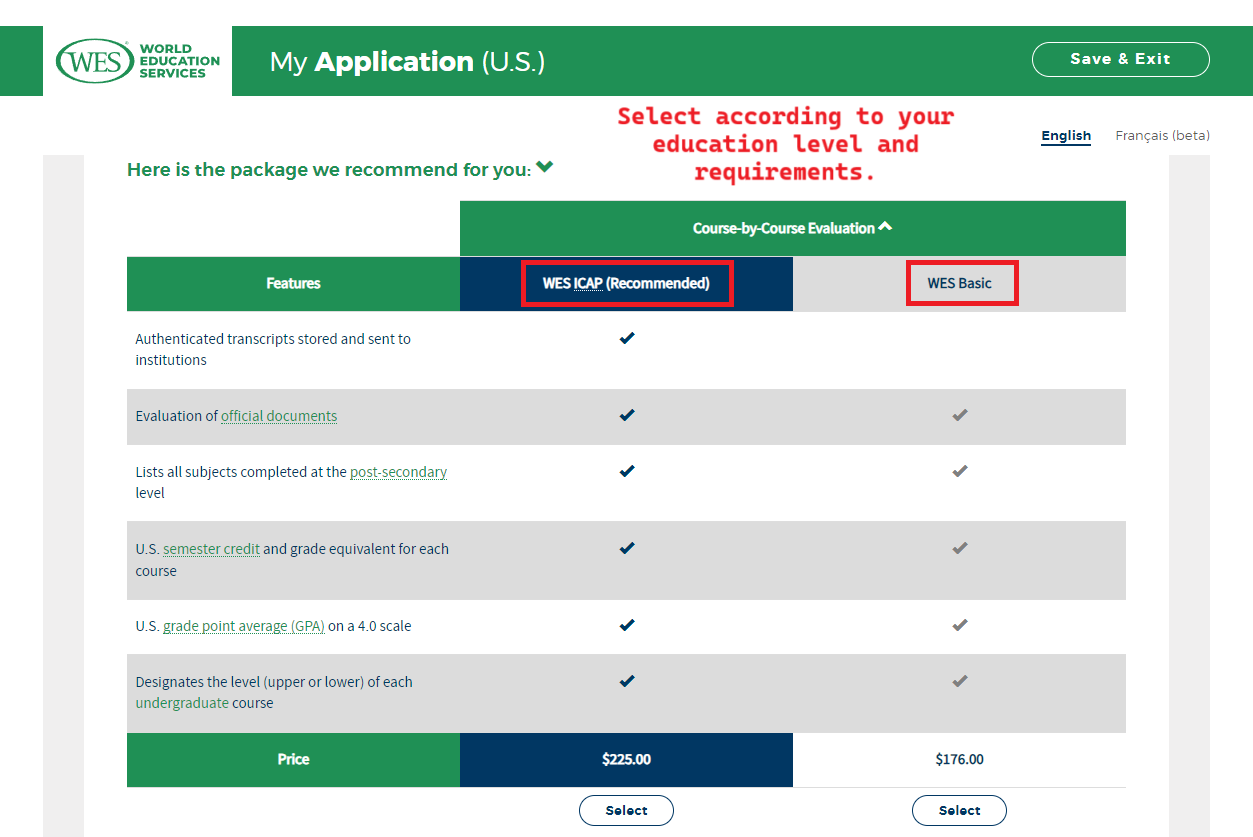
Also, decide between WES ICAP and WES Basic services. WES ICAP stores and sends transcripts directly to institutions, while with WES Basic, you’re responsible for sending your documents. If you want more explanation about this term, then you can read my previous article on the topic “Important details about WES evaluation for Nepali students“
Step 11: Upload the degree certificate and arrange for transcript delivery
Graduate applicants: Upload your provisional degree certificate.
Undergraduate applicants: upload your diploma or certificate.
According to WES guidelines, transcripts must be sent directly by your educational institution to WES; personal uploads are not accepted. However, not all colleges may offer this service to send the transcript to WES. In such cases, request a sealed transcript envelope from your college. It’s important that this envelope remain unopened with a stamp or signature across the back flap, as WES will not accept it otherwise. Also, add the WES reference number, along with your WES’s address, on the back of the sealed envelope. This is to ensure the genuineness of the document. You can see the sample below of what a sealed envelope looks like, and Click on this link to understand what a sealed envelope is.

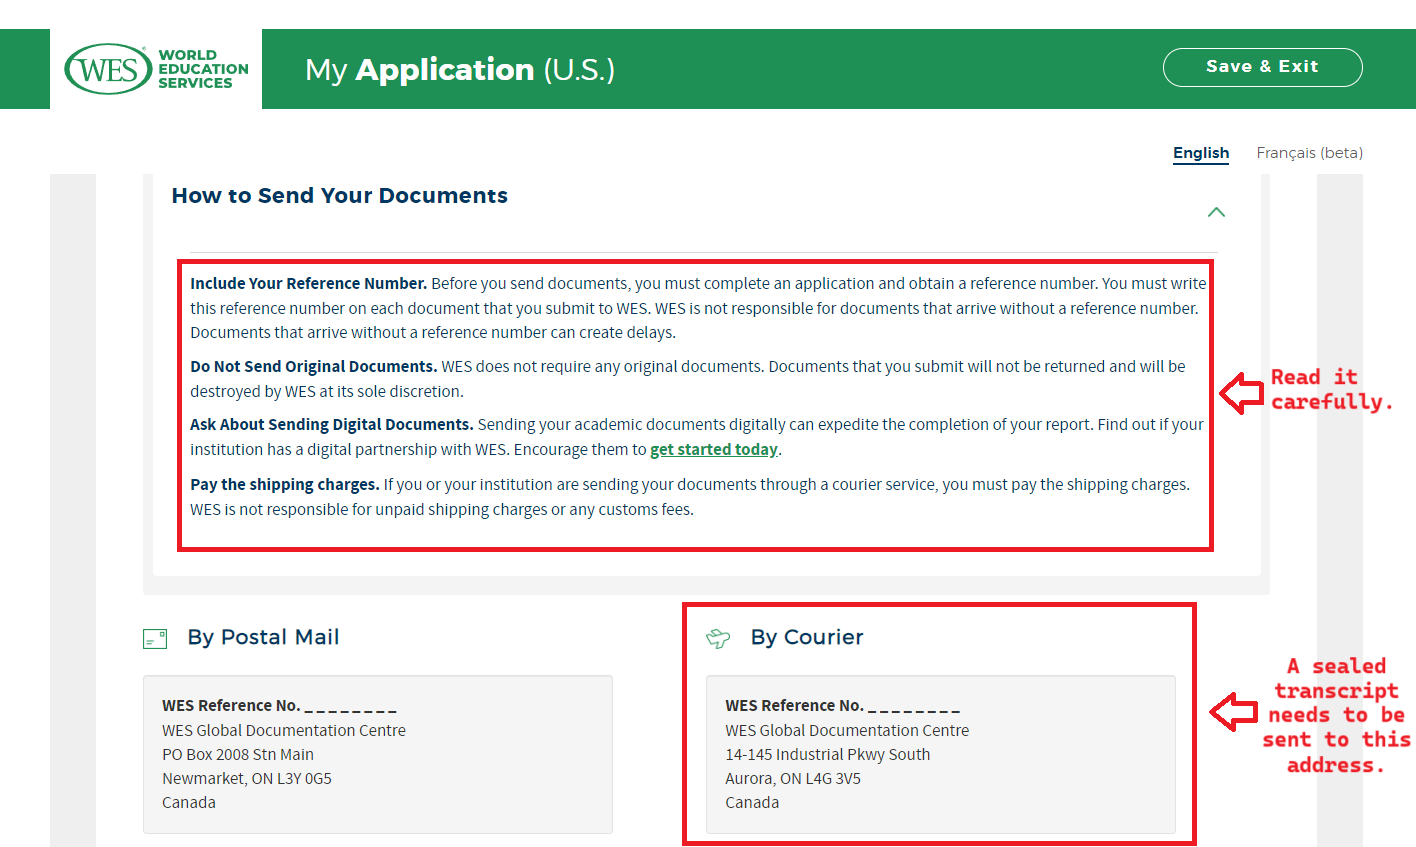
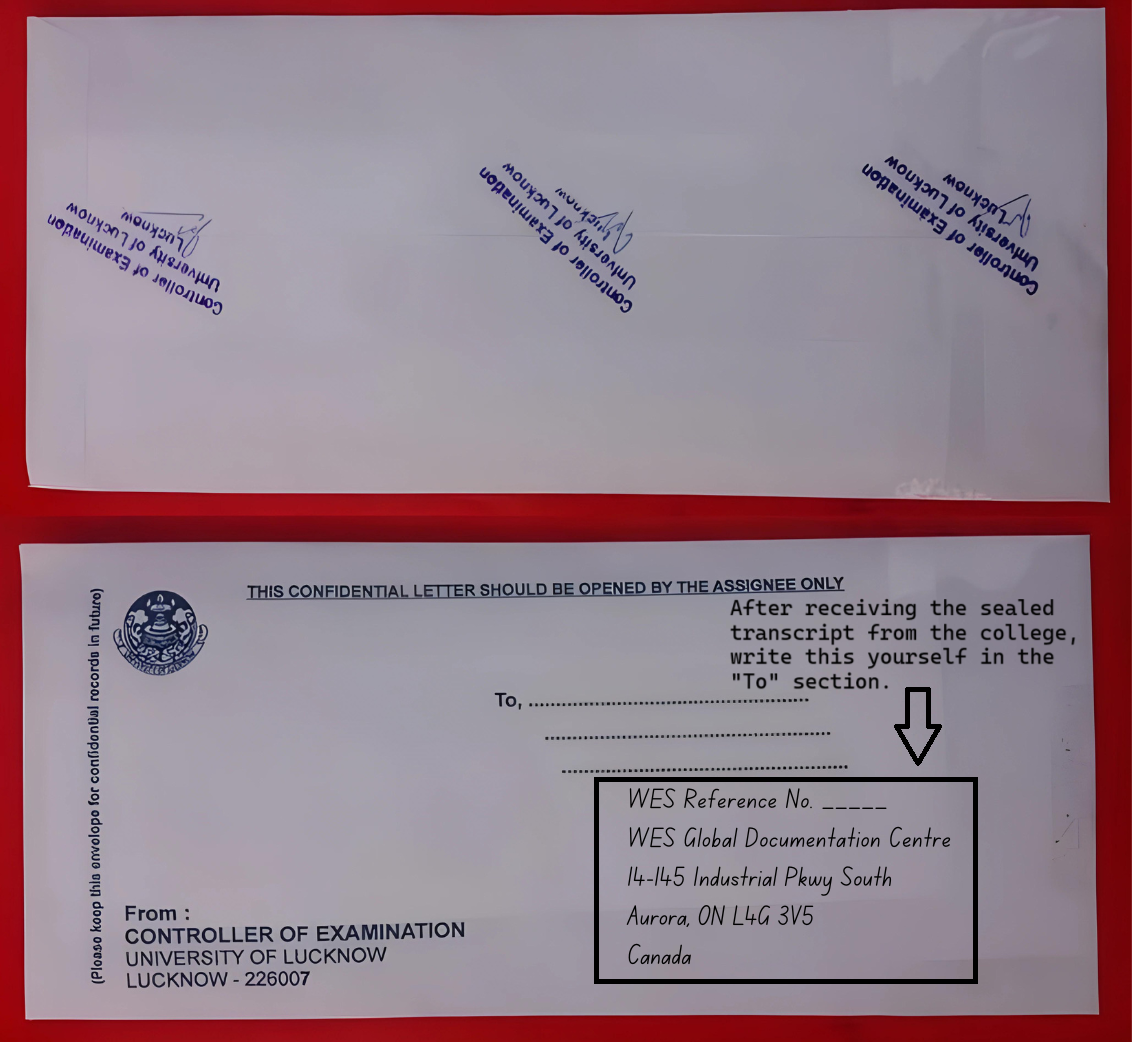
After obtaining the sealed transcript, you can send it to WES via courier services like FedEx or DHL. Also, make another courier envelope for FedEx and ensure the envelope is properly addressed: your college’s address on the left side and your WES reference number, along with your WES’s address, on the right. This reference number should be used for tracking and associating your documents with your application, and finally, put your sealed transcript envelope into the FedEx or DHL courier envelope. You can see the sample courier envelope for FedEx below.

Step 12: Review your information and proceed
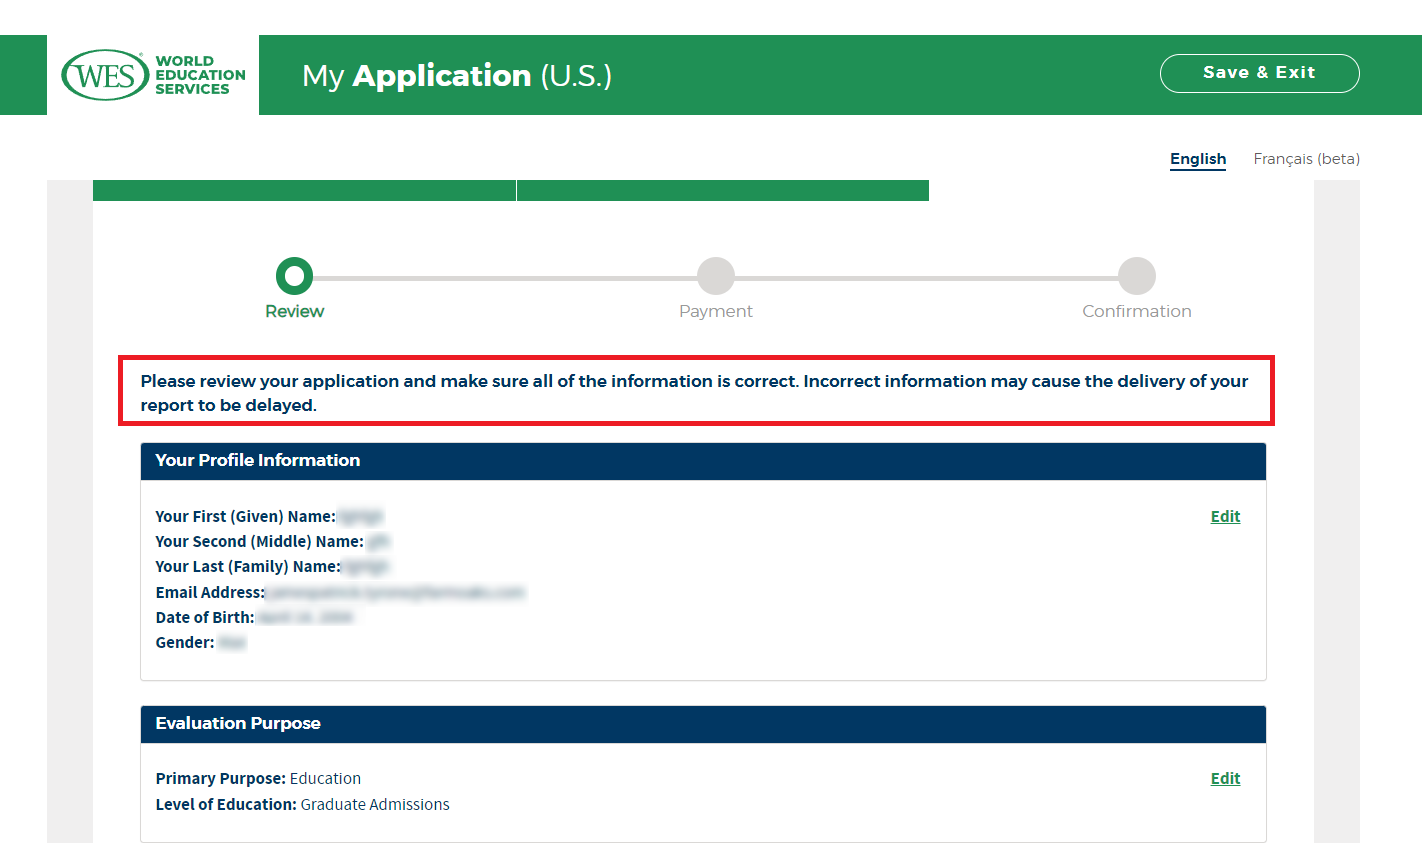
Before moving forward, take a moment to review all the information you’ve entered in your application. Ensure every detail is accurate and reflects your documents correctly. This includes personal details, educational background, mailing address, chosen evaluation type, and any other information provided in previous steps. Once you’re okay and everything is in order, click “Next” to proceed to the final stages of your WES application process.
Step 13: Make the payment and complete your application
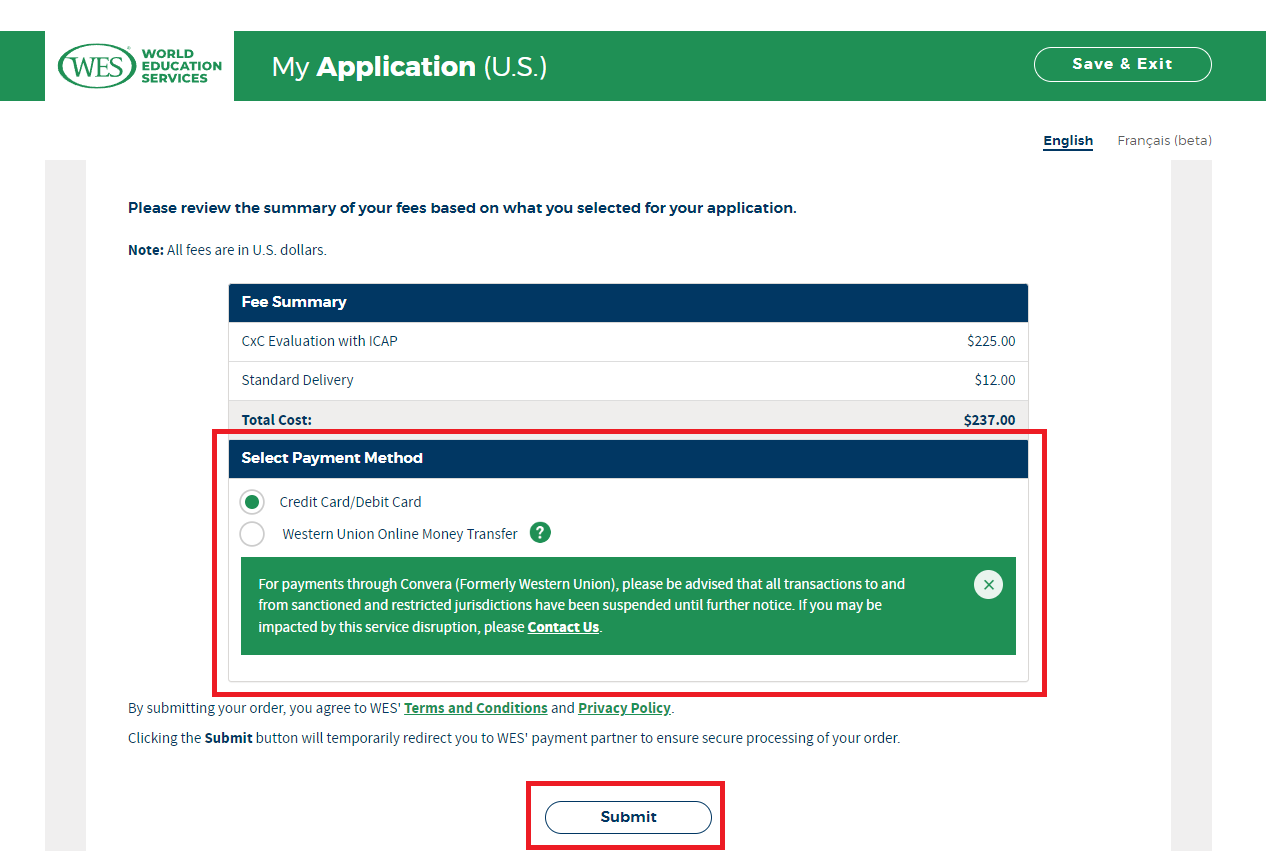
The last stage of your WES application process will be to make the payment for the evaluation service. WES proposes some options to make payments, namely: credit or debit card, Western Union, or by check, at the convenience of the applicant. Please use whichever method is easiest for you.
Conclusion
In a nutshell, a successful application for Nepali students requires careful attention to detail at each step of the WES evaluation, from choosing the right country and ensuring documents are prepared and dispatched in the right manner to every detail. This completes your application process, setting the stage for the next steps in your academic or professional journey. Good luck, and may your efforts lead to rewarding opportunities.

